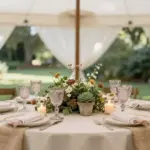
Planning a wedding can be an overwhelming yet exhilarating experience. One aspect that often gets overlooked is the snack table. It’s that space where your guests can mingle, snack, and satisfy their cravings between the ceremony and the main meal. Trust me, a well-curated snack table can elevate your wedding atmosphere, making it feel festive and fun. I created this post to share some imaginative and delightful wedding snack table ideas that will wow your guests and keep the energy high throughout your celebration.
If you’re someone who loves personal touches, DIY projects, or simply wants to provide your guests with an unforgettable experience, you’re in the right place. This guide is designed for couples looking to make their intimate celebrations feel unique and engaging. You’ll find a wide array of creative snack table ideas filled with festive wedding treats and unique finger foods. Whether your style leans toward savory or sweet, I’ve gathered options that will bring a smile to everyone’s face and keep their taste buds dancing.
By diving into these 18 wedding snack table ideas, you’ll discover not just fun wedding appetizers but also practical ways to incorporate them into your special day. Each suggestion is designed to create an enjoyable atmosphere and offer your guests something to munch on while they celebrate. Let’s make your wedding reception a feast for the senses!
Key Takeaways
– Enjoy a variety of themes with creative snack table ideas that reflect your personality and wedding style.
– Explore options like a Mini Taco Bar or DIY S’mores Station for interactive and engaging guest experiences.
– Incorporate sweet treats like Dessert Shooter Bars and Lavish Chocolate Fountains for a festive touch.
– Don’t overlook savory snacks! Offer items like Charcuterie Boards and Bite-Sized Quiches to cater to diverse tastes.
– Remember to keep the layout welcoming and visually appealing to enhance guest interaction and enjoyment.
1. Mini Taco Bar

Craving a fun and interactive snack? A mini taco bar is the perfect solution! Imagine your guests diving into customizable tacos filled with seasoned beef, grilled chicken, or roasted veggies, topped with fresh avocado, vibrant salsa, and zesty cilantro. This lively setup not only fosters mingling but also allows everyone to tailor their bite to their liking, making it a delightful Mexican-inspired experience that they’ll remember fondly.
Ingredients:
– 20 mini taco shells
– 1 lb ground beef or chicken
– 1 can black beans, rinsed
– 1 cup corn
– 1 avocado, diced
– 1 cup shredded cheese
– Variety of salsas and sauces
– Fresh cilantro, chopped
Instructions:
1. Cook the meat in a skillet over medium heat until browned (about 7-10 minutes).
2. Warm the taco shells in the oven as per package instructions.
3. Set up the taco bar with all fillings and toppings in bowls.
4. Let guests create their own tacos!
– Include gluten-free taco shells for guests with dietary restrictions.
– Add a few signature sauces for extra flavor.
FAQs:
– Can I prepare this in advance? Yes, just keep the fillings refrigerated until serving!
– What if someone is vegetarian? Offer a mix of beans and grilled veggies as filling options.
Cost Breakdown & Budget Planning
Planning a wedding snack table can feel overwhelming, especially when it comes to budgeting. But don’t worry, we’re here to break it down for you! Whether you’re looking for something simple or extravagant, knowing where to allocate your funds will help you keep everything under control.
Cost Breakdown by Category:
– Materials/Products: The cost of food and supplies can range from $150 to $600, depending on the size of your guest list and the variety of snacks.
– Tools/Equipment: If you need to rent items like tables, serving dishes, or even a popcorn machine, expect to spend between $50 and $200.
– Labor/Professional Installation: Hiring a catering service or a professional to set up your snack table can cost anywhere from $100 to $500. If you’re doing it yourself, you can save this expense!
– Optional Extras: Additional decorations, custom labels, or themed utensils can add another $50 to $300.
Next, let’s look at budget tiers to help you decide how to spend wisely.
Budget Tier Breakdown:
Basic Economy Tier $
– What’s included: At this level, you’ll get the minimum viable snack options like chips, fruit platters, and store-bought desserts.
– Good for: Small, intimate gatherings or tight budgets.
– Limitations: Limited variety and presentation. You might miss out on those Instagram-worthy moments!
Mid-Range Tier $$
– What’s included: A balanced selection of snacks like mini sandwiches, gourmet popcorn, and a fruit and cheese display.
– Good for: Most couples who want quality without breaking the bank.
– Best value for: It offers the best mix of variety and taste, perfect for a fun, festive atmosphere.
Premium Tier $$$
– What’s included: High-end options like sushi rolls, a dessert shooter bar, and a lavish chocolate fountain.
– Good for: Larger weddings or couples wanting to impress their guests.
– Worth it if: You want a unique experience and can splurge on quality ingredients and presentation.
Money-Saving Tips:
– DIY Some Snacks: Homemade treats can save you money while adding a personal touch. Consider baking cookies or preparing trail mix in bulk.
– Buy in Bulk: Check wholesale stores for snacks. Buying larger quantities can cut costs significantly.
– Limit Alcohol Options: If you serve drinks, stick to one or two types to reduce costs.
– Get Creative with Decor: Use items you already own or borrow from friends to minimize decoration costs.
Where to Splurge:
– Quality Ingredients: Spend more on quality food for your main snacks. Guests notice fresh and flavorful options.
– Presentation: Invest in beautiful serving platters or table decorations. A stunning visual display makes even simple snacks feel special.
By understanding your budget and allocating funds wisely, you can create a wedding snack table that feels both fun and festive without breaking the bank. Plan ahead, stick to your budget, and enjoy your special day!
2. Gourmet Popcorn Station

Looking for a playful snack that pleases everyone? Elevate popcorn from a movie-night staple to a gourmet experience! With flavors like caramel, cheese, chocolate drizzle, and spicy buffalo, your guests will enjoy a delightful array of tastes. Present them in stylish paper bags or clear cups, making it easy for guests to mix flavors and create their unique combinations while they snack throughout the event.
Ingredients for Caramel Popcorn:
– 10 cups popped popcorn
– 1 cup sugar
– 1/4 cup butter
– 1/4 cup corn syrup
– 1/2 teaspoon baking soda
– 1 teaspoon vanilla extract
Instructions:
1. Preheat your oven to 250°F.
2. In a saucepan, melt butter with sugar and corn syrup, stirring until thickened.
3. Mix in baking soda and vanilla.
4. Pour syrup over popcorn, stirring to coat evenly.
5. Bake for 30 minutes, stirring every 10 minutes.
– Offer toppings like melted chocolate and flavored salts for guests to sprinkle on.
– Use fun containers like popcorn boxes to enhance the theme.
FAQs:
– How long will the popcorn stay fresh? Store in airtight containers for up to a week.
– Can I make it ahead of time? Absolutely! Just keep it sealed until serving.
Gourmet Popcorn Station
Editor’s Choice


3. Dessert Shooter Bar

Got a sweet tooth craving? A dessert shooter bar is the perfect answer! These mini desserts, served in elegant glasses, offer layers of indulgence with flavors like chocolate mousse, tiramisu, and cheesecake. Guests can savor a variety of flavors without guilt, thanks to their petite size. This setup is not only delicious but also customizable to fit your wedding theme, ensuring it’s a hit with everyone.
Ingredients for Chocolate Mousse Shooter:
– 1 cup heavy cream
– 1/2 cup granulated sugar
– 1 teaspoon vanilla extract
– 8 oz dark chocolate, melted
– Fresh raspberries for topping
Instructions:
1. In a bowl, beat heavy cream, sugar, and vanilla until soft peaks form.
2. Fold in melted chocolate until combined.
3. Layer mixture in shooter glasses with raspberries on top.
4. Chill until ready to serve.
– Offer a variety of desserts for guests to pick and mix.
– Use colorful sprinkles or edible flowers for decoration.
FAQs:
– Can I prepare these in advance? Yes, they can be made the day before and chilled.
– How do I transport them? Use a sturdy container to prevent spills.
Dessert Shooter Bar
Editor’s Choice


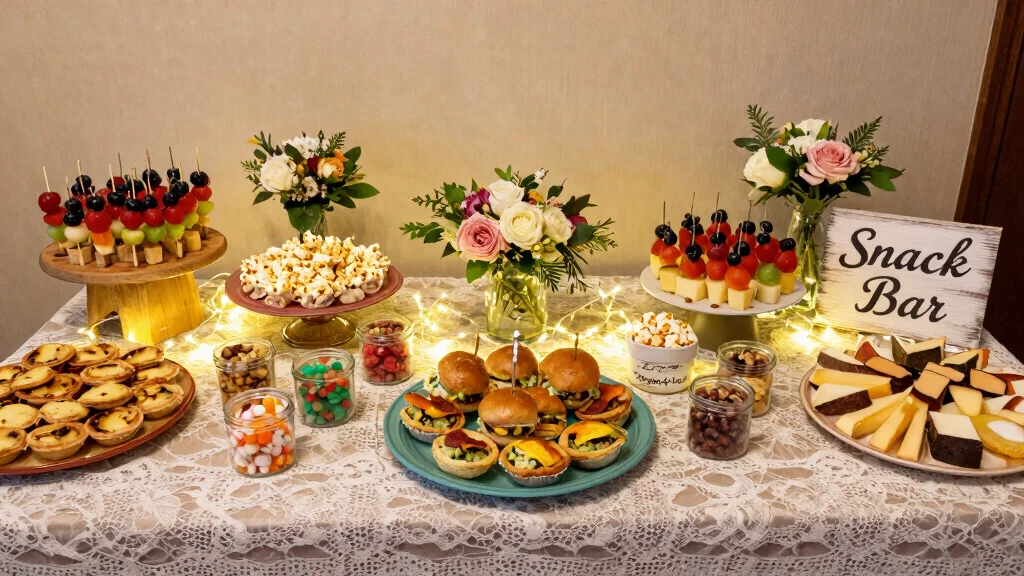
4. Charcuterie Board Extravaganza

Searching for a snack that impresses? A charcuterie board is a feast for the eyes and the palate! This stunning arrangement features an array of cured meats, cheeses, colorful fruits, and crunchy nuts, inviting guests to graze and mingle. Include prosciutto, sharp cheddar, creamy brie, and vibrant fruits like figs and berries for a sophisticated yet casual offering that caters to diverse tastes.
Ingredients:
– 2 types of cured meats (about 8 oz each)
– 3 types of cheeses (about 6 oz each)
– Assorted crackers and bread
– Fresh and dried fruits
– Nuts (almonds or walnuts)
– Honey and jam for dipping
Instructions:
1. Start with a large wooden board or platter.
2. Arrange the meats and cheeses in separate sections.
3. Fill in gaps with fruits, nuts, and crackers.
4. Add small bowls for honey and jam.
– Choose a mix of flavors and textures to appeal to everyone.
– Consider adding some pickles or olives for a briny contrast.
FAQs:
– How do I keep it fresh? Serve at room temperature and cover with plastic wrap until it’s time.
– Can it be made in advance? Yes, assembling it a few hours ahead is perfectly fine!
Charcuterie Board Extravaganza
Editor’s Choice


5. DIY S’mores Station

Want to bring some campfire nostalgia to your wedding? A DIY s’mores station is a fun and tasty way to engage your guests! Supply all the essentials—graham crackers, marshmallows, and a selection of chocolates, including classic milk chocolate and gourmet options. Set up a small fire pit or a tabletop s’mores maker, letting guests toast their marshmallows and assemble their s’mores for a delightful experience.
Ingredients:
– 20 graham crackers
– 20 marshmallows
– 5 chocolate bars (variety)
– Skewers for toasting
Instructions:
1. Set up a table with graham crackers, marshmallows, and chocolate.
2. If using a fire pit, ensure it’s safe and monitored.
3. Guests can roast their marshmallows and assemble their s’mores!
– Include fun toppings for extra flavor, like peanut butter or Nutella.
– Provide wet wipes for easy cleanup.
FAQs:
– Can I set this up indoors? Yes, a tabletop maker is great for indoor use.
– How can I keep the marshmallows fresh? Keep them sealed until serving time.
6. Fruit and Cheese Kabobs

Looking for a refreshing and colorful snack? Fruit and cheese kabobs are the perfect solution! By skewering cubes of creamy cheese with vibrant fruits like strawberries, melon, and pineapple, you create an eye-catching and tasty mix that’s easy for guests to grab and enjoy. Drizzle with balsamic glaze for an extra flavor boost. This healthy option is ideal for warm-weather weddings.
Ingredients:
– 1 lb cheese (cheddar, mozzarella, or gouda)
– 2 cups assorted fruits (strawberries, grapes, pineapple)
– Skewers
– Balsamic glaze for drizzling (optional)
Instructions:
1. Cut cheese into uniform cubes.
2. Wash and prepare fruits, ensuring they’re bite-sized.
3. Alternately thread cheese and fruits onto skewers.
4. Drizzle with balsamic glaze if desired.
– Experiment with different cheese and fruit pairings.
– Arrange them on a platter for an eye-catching display.
FAQs:
– How do I keep them fresh? Cover with plastic wrap and keep chilled until serving.
– Can I add other ingredients? Absolutely, consider adding basil for a fresh twist!
Fruit and Cheese Kabobs
Editor’s Choice


7. Assorted Mini Sandwiches

In search of a snack that caters to everyone? Mini sandwiches are perfect for a variety of tastes! Create a selection with different types of bread and fillings, like classic turkey and cheese, vegetarian hummus with veggies, or even gourmet smoked salmon. This variety ensures there’s something for everyone, making it easy to keep your guests satisfied without a full meal.
Ingredients:
– 1 loaf of whole grain bread
– 1 loaf of white bread
– 8 oz turkey slices
– 8 oz cheddar cheese slices
– 1 cup hummus
– Assorted lettuce, tomato, and cucumber slices
Instructions:
1. Cut bread into small squares for mini sandwiches.
2. Layer turkey and cheese or spread hummus and top with veggies.
3. Assemble the sandwiches and cut into halves.
4. Arrange on platters for serving.
– Use different colored bread for visual interest.
– Consider providing small toothpicks for easy handling.
FAQs:
– How can I store them? Keep mini sandwiches in an airtight container until serving.
– What if I have vegan guests? Make sure to include a vegetarian option with hummus and veggies.
Assorted Mini Sandwiches
Editor’s Choice


8. Sweet and Savory Trail Mix Bar

Want to create a fun, interactive snack experience? A trail mix bar is a fantastic option! Set out a variety of nuts, dried fruits, seeds, and even chocolate chips for guests to mix and match. Consider including items like almonds, raisins, cashews, and M&Ms. Provide cute bags or cups for easy serving, allowing guests to enjoy a delicious sweet and salty balance that everyone loves.
Ingredients:
– 2 cups almonds
– 2 cups cashews
– 1 cup dried cranberries
– 1 cup chocolate chips
– 1 cup pumpkin seeds
Instructions:
1. Set up bowls for each ingredient on a table.
2. Label each bowl for clarity.
3. Provide scoops for guests to create their mixes.
4. Offer bags or cups for guests to take their creations home.
– Include a fun sign that encourages guests to mix and match.
– Consider labeling the health benefits of certain ingredients.
FAQs:
– How long will it stay fresh? Keep in airtight containers for up to a week.
– Can I customize the mix? Absolutely! Tailor it to your taste preferences.
9. Flavored Water Station

Looking for a refreshing beverage option? A flavored water station is a delightful alternative to traditional drinks, especially for summer weddings! Use large glass dispensers filled with water infused with fresh fruits, herbs, or even vegetables. Popular combinations include lemon and mint, cucumber and lime, or strawberry and basil, making hydration both delicious and visually appealing.
Ingredients:
– 1 gallon of water
– 2 cups sliced fruits (lemons, cucumbers, strawberries)
– Fresh herbs (mint, basil)
Instructions:
1. Fill glass dispensers with water.
2. Add sliced fruits and herbs to infuse the water.
3. Chill in the fridge a few hours before serving.
4. Set out glasses for guests to enjoy.
– Use seasonal fruits for added freshness.
– Have fun signage that promotes hydration!
FAQs:
– How long can I let it infuse? Ideally, 2-4 hours for the best flavor.
– Can I use sparkling water? Yes, that adds a nice twist!
Fun fact: A flavorful water station can cut beverage costs by up to 30% at summer weddings, while boosting the appeal of your wedding snack table ideas. Guests sip more when water is infused with lemon, mint, and cucumber—it’s practical, refreshing, and Instagram-ready.
10. Savory Caprese Skewers

Craving a classic Italian appetizer? Savory Caprese skewers are a must-have! These easy-to-eat bites combine juicy cherry tomatoes, fresh mozzarella balls, and fragrant basil, all drizzled with balsamic glaze. They not only look beautiful but also burst with flavor, making them perfect for warm-weather celebrations.
Ingredients:
– 2 pints cherry tomatoes
– 20 mini mozzarella balls
– Fresh basil leaves
– Balsamic glaze for drizzling
– Skewers
Instructions:
1. Thread a tomato, followed by a basil leaf and mozzarella ball onto each skewer.
2. Repeat until all ingredients are used.
3. Drizzle with balsamic glaze before serving.
– Add a pinch of salt and pepper for added flavor.
– Serve chilled for a refreshing snack.
FAQs:
– Can they be made in advance? Yes, prepare a few hours ahead and keep in the fridge.
– What can I use instead of mozzarella? Try feta cheese for a different flavor!
11. Bite-Sized Quiches

Searching for a delicious and versatile snack? Bite-sized quiches are the answer! These mini treats can be filled with a variety of ingredients, such as spinach and feta, ham and cheese, or classic Lorraine. Perfect for any time of day, they are easy for guests to grab while mingling and can be made in advance to serve at room temperature.
Ingredients:
– 1 package pre-made pastry dough
– 6 eggs
– 1 cup heavy cream
– 1 cup cheese (cheddar or Swiss)
– 1 cup assorted fillings (spinach, ham, mushrooms)
Instructions:
1. Preheat the oven to 375°F.
2. Roll out pastry dough and cut into circles for cups.
3. In a bowl, whisk eggs and cream together.
4. Fill each pastry cup with cheese and fillings, then pour egg mixture on top.
5. Bake for about 15-20 minutes until golden.
– Experiment with seasonal veggies for unique flavors.
– Serve warm or at room temperature.
FAQs:
– Can I freeze mini quiches? Yes, freeze and reheat them for later.
– What if I don’t have pastry dough? You can use phyllo dough as a lighter option.
Fun fact: bite-sized quiches are the ultimate wedding snack table ideas—easy to prep, easy to grab, and delicious at room temperature. Mix fillings like spinach and feta or ham and cheese, and guests can snack while mingling all through the reception.
12. Savory Waffle Sliders

Want to add a twist to your wedding snacks? Savory waffle sliders are a delightful option! Using mini waffles as the base, fill them with delicious ingredients like shredded chicken, crispy bacon, or even eggs and cheese. These bite-sized creations are not only playful but also comforting, sure to have guests returning for seconds!
Ingredients:
– 20 mini waffles (store-bought or homemade)
– 10 oz cooked chicken, shredded
– 10 slices bacon, cooked and crumbled
– 1 cup shredded cheese
– Maple syrup for drizzling
Instructions:
1. If making homemade waffles, prepare them in advance.
2. Layer shredded chicken, bacon, and cheese between two mini waffles.
3. Drizzle with maple syrup before serving.
– Include a variety of proteins for different tastes.
– Decorate with small flags for a fun touch.
FAQs:
– Can I prepare these in advance? Assemble them and keep them warm in the oven until serving.
– How can I make them vegetarian? Use veggie patties instead of chicken.
13. Colorful Veggie Cups with Dip

Looking for a healthy, vibrant snack option? Colorful veggie cups are the way to go! Fill individual cups with a mix of fresh raw vegetables like carrot sticks, celery, bell pepper strips, and cucumber slices, paired with a delicious dip like ranch or hummus. This bright addition not only adds a pop of color to your snack table but also caters to those seeking lighter fare.
Ingredients:
– 2 cups assorted raw vegetables (carrots, celery, peppers, cucumber)
– 2 cups dip (ranch dressing or hummus)
– 20 small cups for serving
Instructions:
1. Wash and cut vegetables into sticks or bite-sized pieces.
2. Arrange vegetable sticks in small cups.
3. Add a portion of dip at the bottom of each cup.
4. Serve chilled.
– Use colorful vegetables for visual appeal.
– Provide a mix of dips to cater to different tastes.
FAQs:
– How long can they sit out? They should be consumed within 2 hours for freshness.
– Can I prepare them in advance? Yes, just keep them refrigerated until serving.
14. Delicious Stuffed Mushrooms

Want a classic appetizer that never disappoints? Stuffed mushrooms are a crowd-pleaser! These savory bites can be filled with a variety of mixtures, from creamy cheese and herbs to sausage and breadcrumbs. Packed with flavor, they’re perfect for mingling and can be made ahead of time, then reheated just before serving.
Ingredients:
– 20 large mushrooms, stems removed
– 1 cup cream cheese, softened
– 1/2 cup breadcrumbs
– 1/4 cup grated Parmesan cheese
– 1 teaspoon garlic powder
Instructions:
1. Preheat the oven to 375°F.
2. In a bowl, mix cream cheese, breadcrumbs, Parmesan, and garlic powder until combined.
3. Stuff each mushroom cap with the mixture.
4. Bake for 15-20 minutes until golden and bubbly.
– Experiment with different fillings, such as spinach or crab.
– Garnish with fresh herbs for an elegant touch.
FAQs:
– Can they be frozen? Yes, prepare them and freeze before baking.
– How do I choose the right mushrooms? Look for large caps that are firm and fresh.
Did you know stuffed mushrooms are a standout in wedding snack table ideas? Filling 20 large mushrooms with cream cheese and Parmesan creates bite-sized bites that vanish fast, keeping the celebration lively and flavorful.
15. Unique Sushi Rolls

Craving something unique for your wedding snacks? Unique sushi rolls are a fantastic choice! Customize them with various fillings, from traditional tuna to vegetarian options like cucumber or avocado. These bite-sized delights not only look beautiful but also offer a fun twist for guests looking for something different. Pair them with soy sauce, wasabi, and pickled ginger for an authentic touch.
Ingredients:
– 2 cups sushi rice
– 4 sheets nori (seaweed)
– 1 lb fresh fish (like salmon or tuna) or assorted veggies
– Soy sauce, for serving
Instructions:
1. Rinse sushi rice under cold water until it runs clear.
2. Cook rice according to package instructions and let cool.
3. Place nori on a bamboo mat, spread rice, and layer fillings.
4. Roll tightly and slice into pieces.
5. Serve with soy sauce.
– Use sushi mats for an easier rolling process.
– Consider offering vegetarian rolls for guests with dietary restrictions.
FAQs:
– How do I keep sushi fresh? Serve immediately or refrigerate for a few hours.
– Can I make this in advance? Sushi is best enjoyed fresh but can be prepared a few hours in advance.
16. Festive Cake Pops

Looking for a trendy and fun treat? Festive cake pops are the answer! Made in various flavors like classic vanilla or rich chocolate, these bite-sized delights are dipped in colorful coatings and topped with sprinkles or edible glitter. Not only do they look amazing, but they also provide a sweet finish to your wedding snack table, arranged beautifully on a decorative stand.
Ingredients:
– 1 cake mix (any flavor)
– 1 can frosting
– 1 lb melting chocolate
– Sprinkles for decoration
Instructions:
1. Bake the cake as per package instructions and let it cool.
2. Crumble the cake into a bowl and mix in frosting until you can form balls.
3. Roll into balls and freeze for 30 minutes.
4. Dip pops in melted chocolate and decorate with sprinkles.
5. Insert sticks into cake balls and let set.
– Experiment with flavors for diversity.
– Use a cake pop stand for easy serving.
FAQs:
– How long can they be stored? They stay fresh in the fridge for up to a week.
– Can I use store-bought cake? Yes, that saves time!
17. Elegant Canapés

Want to add a touch of sophistication to your wedding? Elegant canapés are the perfect choice! These small, decorative appetizers feature various toppings on a base of bread, pastry, or crackers. From smoked salmon with cream cheese to fresh brie with berry compote, these tasty bites are easy to manage while mingling and can be personalized to match your wedding theme.
Ingredients:
– 20 mini toasts or crackers
– 1 package cream cheese
– 1 lb smoked salmon
– Fresh herbs (dill or chives)
Instructions:
1. Spread cream cheese on each toast or cracker.
2. Top with a piece of smoked salmon and garnish with herbs.
3. Arrange on a platter for serving.
– Experiment with various toppings for diversity.
– Use herb sprigs for added color and flavor.
FAQs:
– How do I keep them fresh? Keep covered until serving.
– Can I make them in advance? Yes, prepare them a few hours ahead and store in the fridge.
18. Lavish Chocolate Fountain

Want to wow your guests with a sweet experience? A chocolate fountain is the ultimate indulgence for your wedding snack table! This interactive dessert option allows guests to dip fruits, marshmallows, and pretzels into warm, flowing chocolate, creating a fun and memorable activity. The sight of luscious melted chocolate will entice everyone, making it a delightful centerpiece for your celebration.
Ingredients:
– 2 lbs of high-quality chocolate (dark, milk, or white)
– Assorted dippers: strawberries, marshmallows, pretzels, and cookies
Instructions:
1. Melt chocolate according to fountain instructions.
2. Pour melted chocolate into the fountain and turn it on.
3. Set out an assortment of dippers for guests.
4. Let guests enjoy dipping their favorite treats!
– Keep napkins and skewers readily available for convenience.
– Consider offering different chocolate flavors for variety.
FAQs:
– How long will the chocolate last? It can run for several hours when kept warm.
– Can I use regular chocolate? Yes, but high-quality chocolate works best.
Conclusion

From quirky taco bars to elegant canapés, these 18 wedding snack table ideas will make your special day feel personal and festive.
By incorporating fun and delicious treats, you can create an inviting atmosphere that keeps guests happily mingling and enjoying the celebration. So play with these ideas, add your twist, and let your wedding snack table shine!
Note: We aim to provide accurate product links, but some may occasionally expire or become unavailable. If this happens, please search directly on Amazon for the product or a suitable alternative.
This post contains Amazon affiliate links, meaning we may earn a small commission if you purchase through our links, at no extra cost to you.
Frequently Asked Questions
What are some easy DIY wedding snack table ideas for an intimate celebration?
For an intimate celebration, these wedding snack table ideas help you keep prep manageable while delivering big impact.
Think a compact display with 1–2 hero bites and several easy crowd-pleasers: mini sliders, crostini bar, caprese skewers, veggie cups with dip, roasted nuts, and bite-size desserts like macarons. Use a cohesive display style and label each option with charming tags so guests know what to grab, turning the table into a focal moment of the reception. Do as much ahead of time as possible, keep perishables cool, and assign a helper to refresh the spread as guests mingle.
How can I create creative snack table ideas that feel fun and festive on a budget?
Start with a limited color palette and repeat textures to make creative snack table ideas look intentional without overspending.
Choose 4-6 items that mix store-bought convenience with homemade touches: a crostini bar, a DIY trail mix station, a fruit skewer display, a simple cheese board, and sweet treats in a decorative jar lineup. Use tiered stands and reusable serving ware to add height without buying new pieces, and label options clearly so guests can self-serve. Pair items with seasonal produce and plan around a simple, cohesive theme to keep wedding snack table ideas both affordable and festive.
Which unique wedding finger foods are crowd-pleasers for a smaller guest list?
For a smaller guest list, you can lean into unique wedding finger foods that feel special but are easy to prep in batches.
Try options like stuffed mushrooms, caprese skewers, mini quiches, cucumber cups with herbed cream cheese, bacon-wrapped dates, or shrimp cocktail spoons. Present them on different heights and add a few stand-out savory bites alongside dessert bites to cover all tastes. The result is a memorable, easy-to-eat spread that highlights fun wedding appetizers and keeps mingling flowing.
How should I display and label wedding reception snacks for easy guest access at a DIY snack table?
Aim for a warm, organized look that invites guests to mingle around the display.
Layer items at different heights, use clear labeling cards, and group items by category (savory, vegetarian, gluten-free). Place hot items in small chafing dishes or warming trays, and keep cold items chilled in bowls over ice. Add allergen-friendly notes and simple arrows so guests can find what they need quickly. With clear signage, wedding reception snacks become both accessible and photogenic, matching your wedding snack table ideas theme.
What are practical tips to coordinate fun wedding appetizers with the main menu and theme?
Start by mapping your snack ideas to the course flow and overall theme, so wedding snack table ideas feel like a natural extension of the menu.
Choose flavors that complement the main course and avoid duplicating dishes. Consider dietary needs (vegetarian, gluten-free) and label accordingly. Schedule timing so the snack table opens at the right moment and doesn’t compete with the main courses. Finally, coordinate colors, textures, and props to keep the focus on a festive, cohesive look that elevates the entire reception.
Related Topics
wedding snack table
DIY wedding snacks
festive wedding treats
creative snack ideas
intimate celebrations
unique finger foods
fun wedding appetizers
easy wedding snacks
stylish reception snacks
budget friendly weddings
seasonal wedding treats
elegant snack displays